
Hiking the Entire Length of Isterdalstindane Mountain Range. (27.08.2020)

Skrevet av Solan (Atle Solholm)

| Startsted | Trollstigen Tourist Center (696moh) |
|---|---|
| Sluttsted | Åndalsnes (11moh) |
| Turlengde | 18t 18min |
| Distanse | 26,5km |
| Høydemeter | 3332m |
| GPS |
|
| Bestigninger | Bispen (1461moh) | 27.08.2020 |
|---|---|---|
| Brøttfonntinden (1171moh) | 27.08.2020 | |
| Dronninga (1542moh) | 27.08.2020 | |
| Dronninga nordspiret (1517moh) | 27.08.2020 | |
| Haugabotstinden (1158moh) | 27.08.2020 | |
| Karitinden (1353moh) | 27.08.2020 | |
| Kongen (1611moh) | 27.08.2020 | |
| Kongskneet (1377moh) | 27.08.2020 | |
| Setnesfjellet (1238moh) | 27.08.2020 | |
| Svartebottstinden (1207moh) | 27.08.2020 | |
| Ølmannstinden (1161moh) | 27.08.2020 | |
| Nordre Ølmannstinden (1027moh) | 27.08.2020 | |
| Andre besøkte PBE'er | Dronninga - Fra Kongskneet (1350moh) | 27.08.2020 |
| Kongskneet - Løs renne mot Dronninga (1400moh) | 27.08.2020 | |
| Nuken utsiktsplass (320moh) | 27.08.2020 | |
| Setnesfjellet antenne (745moh) | 27.08.2020 | |
| Trollstigen Parkeringsplass (697moh) | 27.08.2020 |
![Image #1: The three southernmost peaks of Isterdalstindane Mountain Range (from left to right): Bispen ["The Bishop"], Kongen ["The King"], and Dronninga ["The Queen"]. These three mountains are the steepest, and most exciting ones of this range.](https://images1.peakbook.org/images/14939/Solan_20201218_5fdce0018847e.jpg?p=xtralarge)
![Image #2: Bispen [i.e. "The Bishop"] as seen from the trail ascending from Trollstigen Tourist Center to Lake Bispevatnet [i.e. "The Bishop's Lake". The south ridge of Mount Bispen is quite steep, and a bit challenging to climb.](https://images1.peakbook.org/images/14939/Solan_20201218_5fdce07be1b8a.jpg?p=xtralarge)
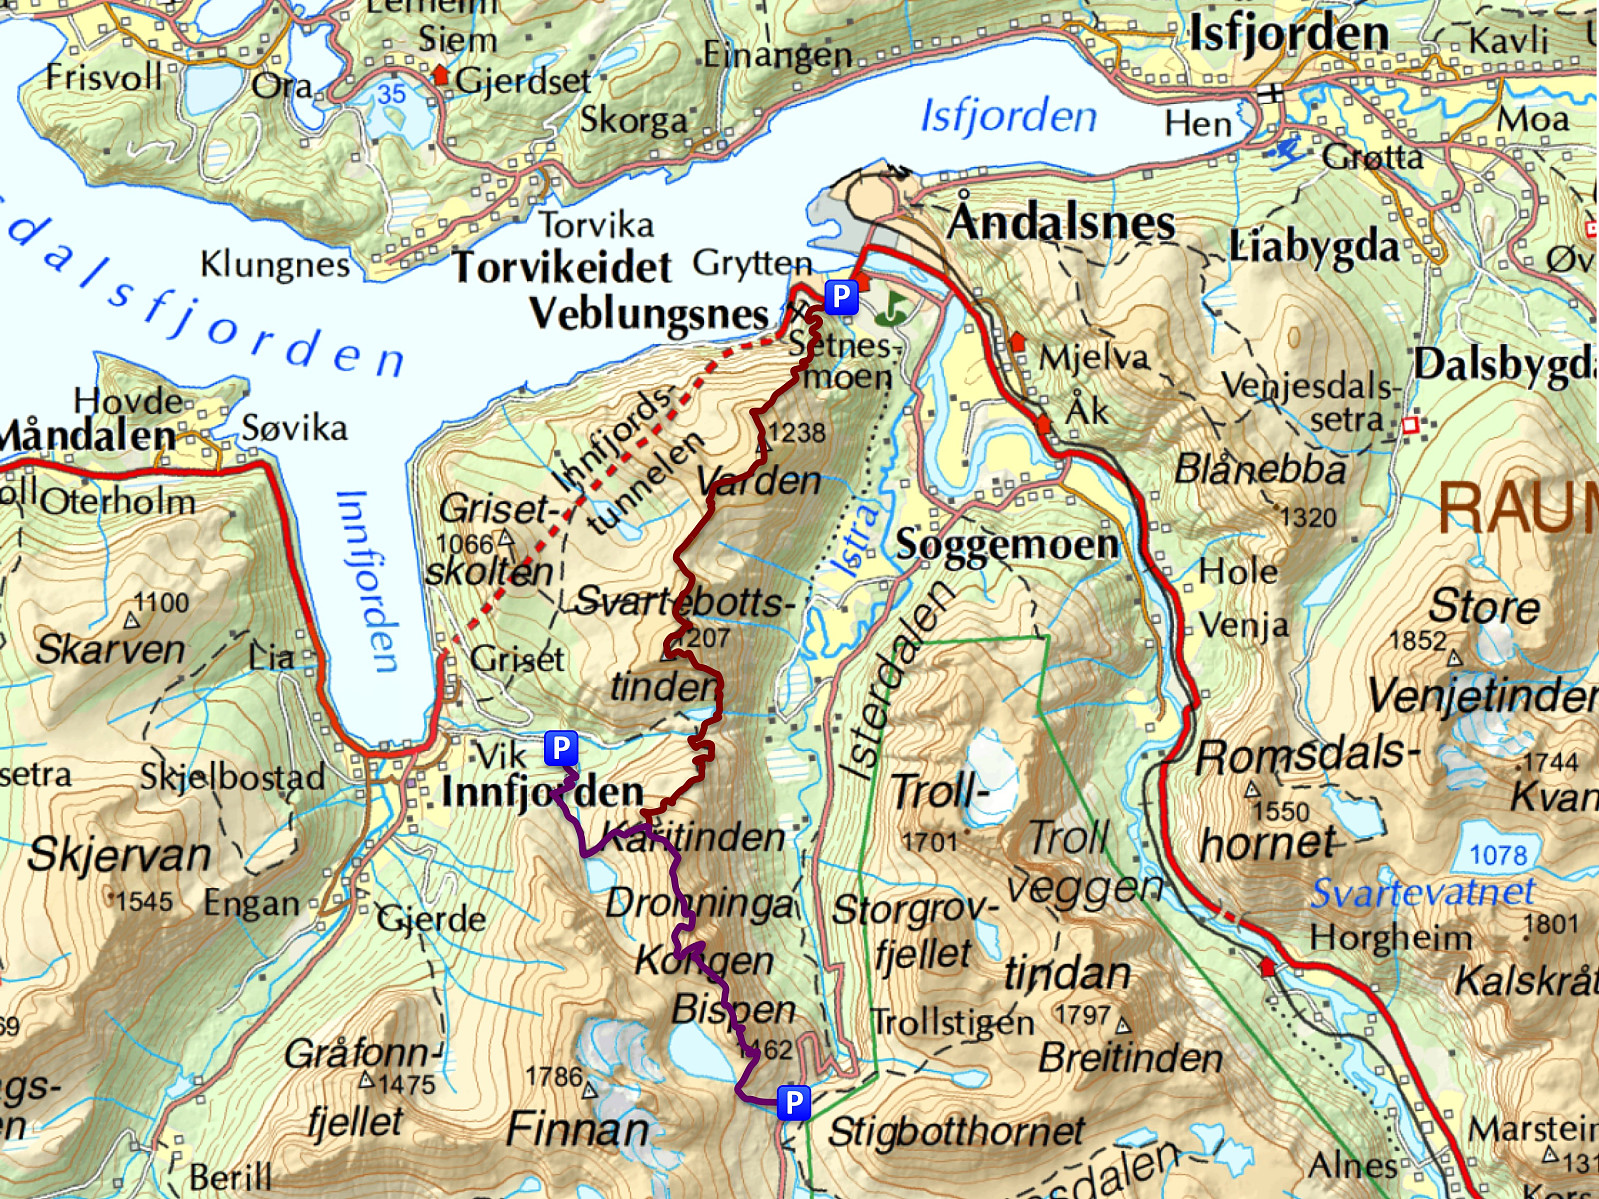
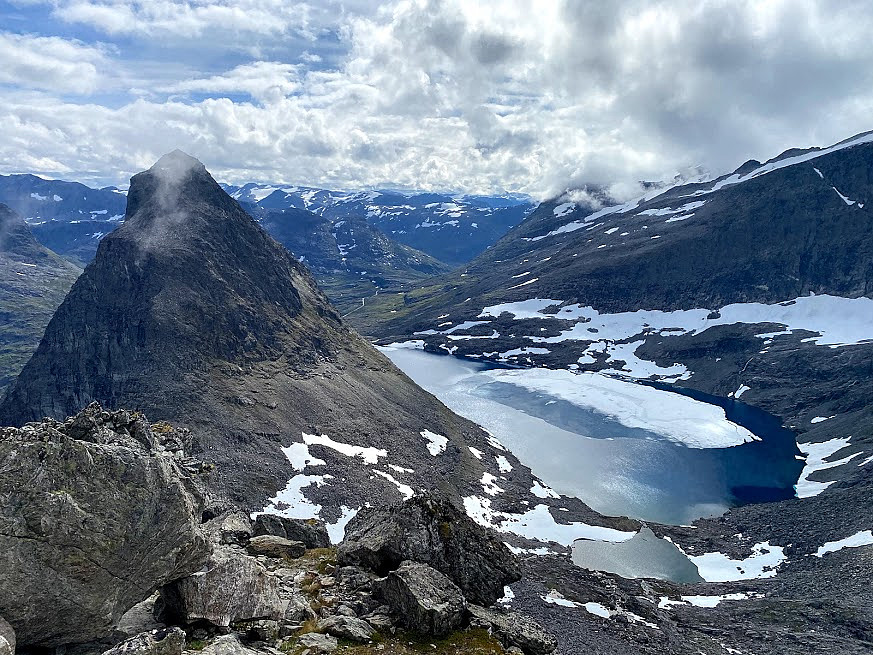
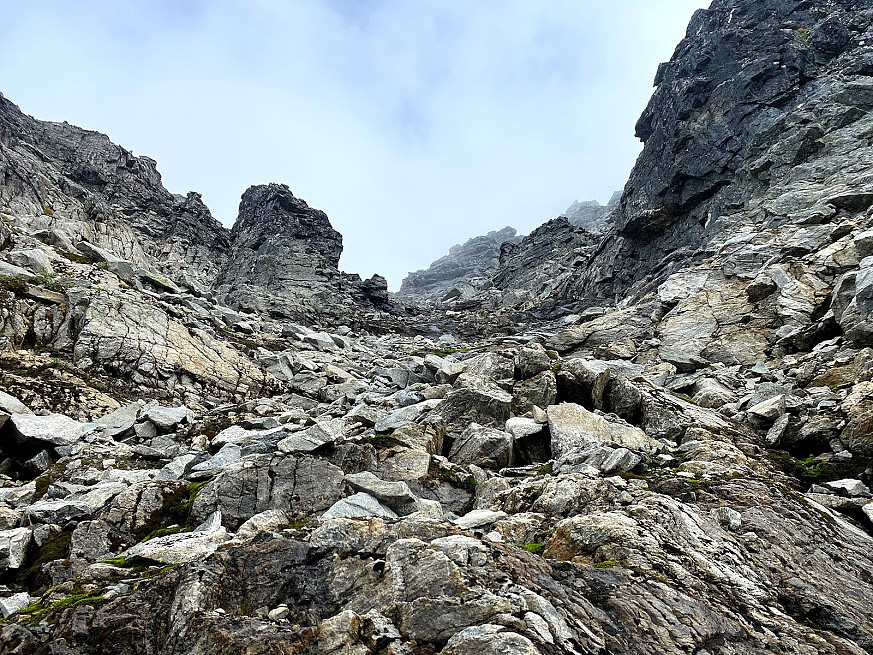
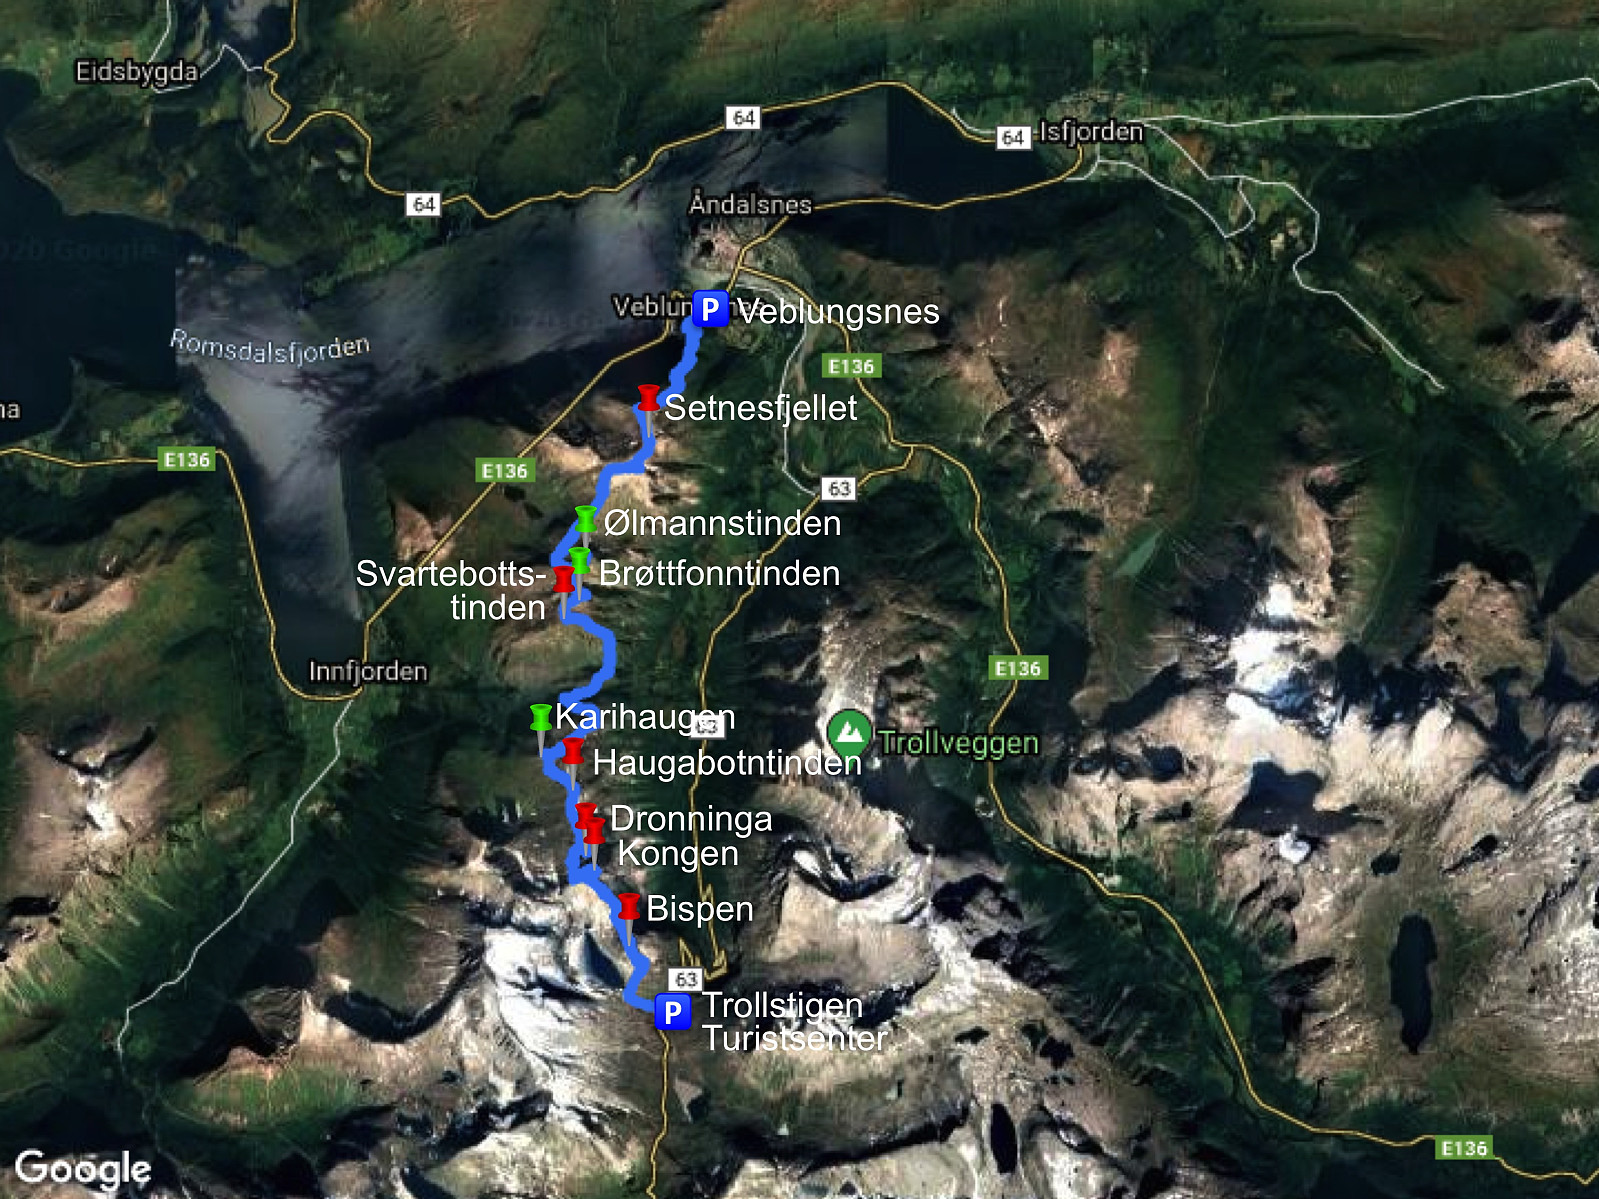
In the Rauma Municipality in Norway, there are three exciting mountains called the Bishop, the King and the Queen [in Norwegian Bispen, Kongen and Dronninga]. I don’t think they have been named after the pieces of the chessboard, because in Norwegian the Bishop of the chess game is called the runner [Norw.: Løperen]. Anyway, these three mountains are the first three mountains of a mountain range stretching from the site of the famous Trollstigen Escarpment Road to the little town of Åndalsnes, which is located by the shores of the fjord called Romsdalsfjorden, and yet is surrounded by amazing mountains on all sides. Now, being inspired by some ladies that had climbed The Bishop, The King, and The Queen in one single row, and in one single day; I had been planning for some time to do a similar mountain trek this very summer holiday. Moreover, I had done some extensive research in advance of my planned trek; and so I had twice climbed the south ridge of The Bishop (and both times descended along the north ridge), I had twice ascended The King, and I had three times climbed the Queen; one time directly from Trollstigen Tourist Center, one time via The King and the knoll called The King's Knee; and the third time from the fjord called Innfjorden via the mountain called Mount Haugabotntinden. Now, in order to even improve the challenge a little, I had actually been thinking of including Mount Haugabotntinden on the trek; and so my plan had been to start out from Trollstigen Tourist Center in the morning hours, then traverse the four mountains of Bispen, Kongen, Dronninga and Haugabotstinden, and finally end up in a valley called Vikdalen by the fjord of Innfjorden (See purple track in Image #3).
After a hike to Mount Norafjellet and Mount Nordre Trolltind a little bit earlier this summer, I had, however, slightly changed my plans. From Norafjellet you could very well see the entire length of the long mountain range, of which The Bishop, The King and The Queen are the three southernmost peaks. And that was when I came up with the idea of trekking the entire length of the range, in stead of just half of it. I then had, subsequent to that decision, actually made some further research by climbing the southeast ridge up to the summit of Mount Svartebottstinden, as well as the north face of Mount Haugabotntinden up to the knoll called Karihaugen. Furthermore, I had earlier this summer visited Mount Setnesfjellet just south of the town of Åndalsnes along with my son, and so I now felt that I was somehow ready for this 8 or 10 mountain trek (or 7), depending a bit on how you count them [See my gps track as well as the maps of Images #3 and #43].
![Image #4: Lake Bispevatnet [i.e. "The Bishop's Lake"] with its beautiful blue water. Mount Bispen is seen to the right, and Mount Finnan to the left. Mount Kongen [i.e. "The King"] is partially hidden behind "The Bishop".](https://images1.peakbook.org/images/14939/Solan_20201216_5fda71b7843a2.jpg?p=xtralarge)
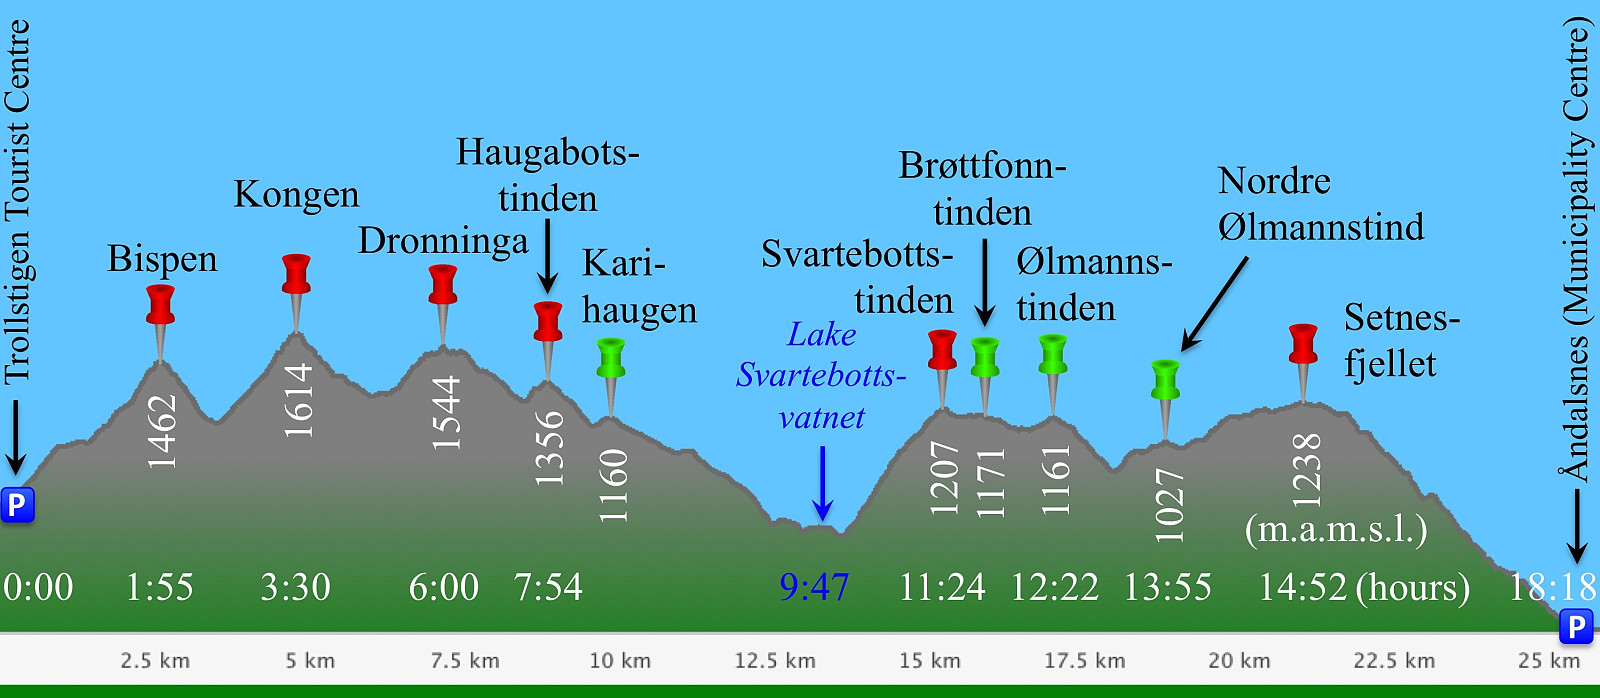
So, on this fairly nice looking morning, I borrowed my wife's car, and drove to the town of Åndalsnes, and from there up the renown Trollstigen Escarpment Road to Trollstigen Tourist Center, where I parked the car at the parking lot. From there I embarked upon my long trek climbing The Bishop (1462 m.a.m.s.l.), The King (1614), The King’s Knee (1317), the main peak of The Queen (1544), The North Peak of the Queen, with the “Tilting Boulder” (1534), Mount Haugabotntinden (1356), Mount Karihaugen (1169), Mount Svartebotstinden (1207), Mount Brøttfonntinden (1171), Mount Ølmannstinden [i.e. the “beerman’s peak”] (1161), Nordre Ølmannstinden [i.e. the “northern beerman’s peak] (1027) and Mount Setnestinden (1238); finally descending to the town of Åndalsnes. [I have included in brackets the elevation of the mountains, though Norwegian mountains aren’t primarily renown for their elevation (after all, Norway is a country located by the ocean); but for their steepness, their rocky appearance, and their high vertical cliffs].
![Image #6: Just before you reach the summit of "The Bishop", you have to traverse a roof-top shaped ridge usually called "The Roof" [Norwegian: "Taket"].](https://images1.peakbook.org/images/14939/Solan_20201216_5fda7749b9c4f.jpg?p=xtralarge)
![Image #7: Lake Bispevatnet [i.e. "The Bishop's Lake"] as seen from Mount Bispen. The mountain on the other side of the lake is Mount Finnan (1786 m.a.m.s.l.).](https://images1.peakbook.org/images/14939/Solan_20201216_5fda77e388287.jpg?p=xtralarge)
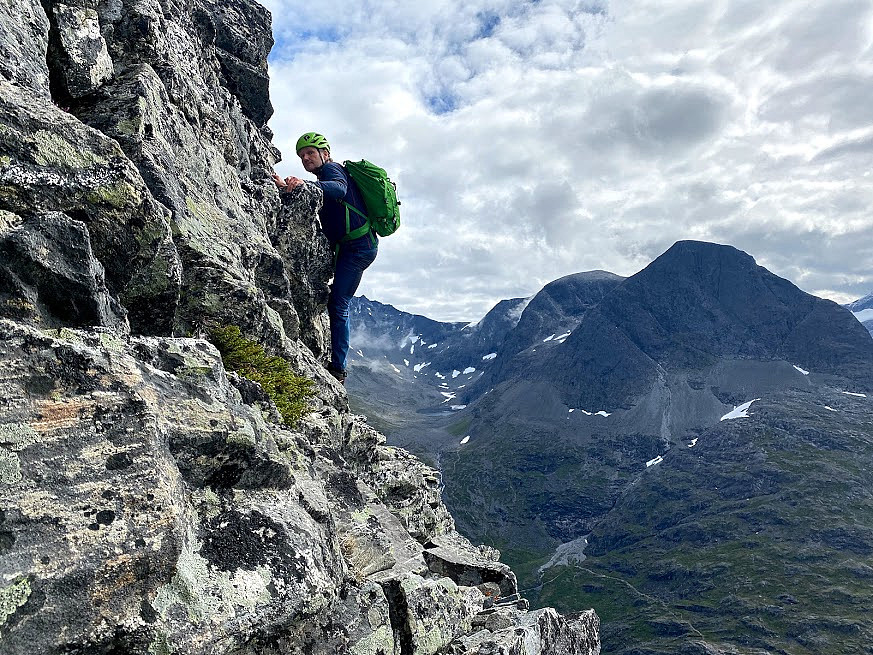
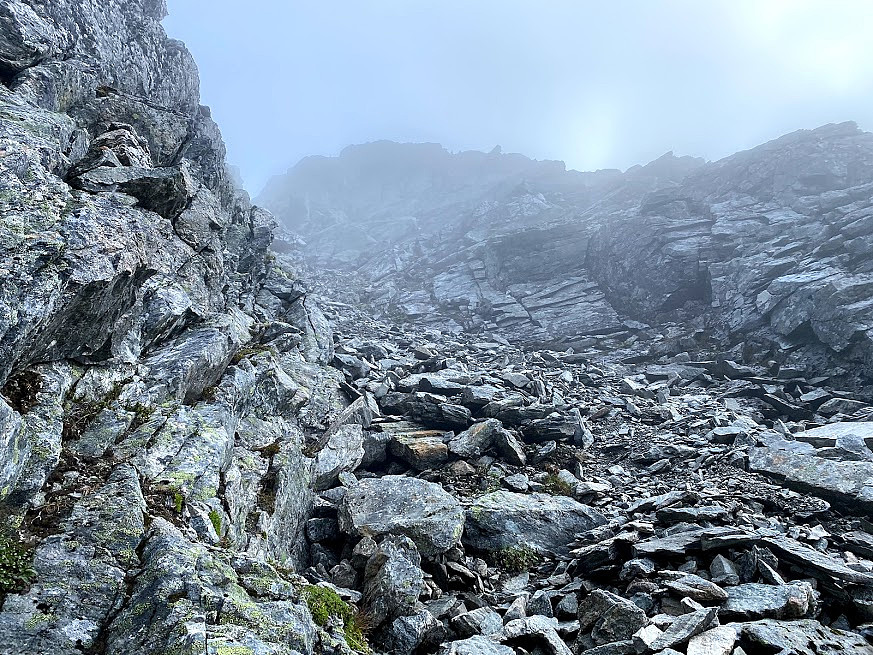
I started out from the tourist center, and hiked up to the plateau between Mount Bispen [i.e. "The Bishop"] and Mount Finnan, where the beautiful lake Bispevatnet [i.e. "The Bishop's Lake"] with its dark blue water is located (Image #4). Lake Bispevatnet is located at 1000 m.a.m.s.l., whereas the tourist center is located at about 700 m.a.m.s.l.; and the hike up to the lake takes about 25 minutes. From the shores of the lake I rushed over to the south ridge of Mount Bispen, and embarked upon climbing. It is generally recommended to use climbing gear as you climb this south ridge of The Bishop, as the climb is quite steep (Image #5). Nevertheless, as you climb, you do have firm rock to hold onto all the way up; and if you are used to steep climbing, you're unlikely to fall down, unless you have the bad fortune of having a stroke or an epileptic seizure during your climb. As for myself, I've previously climbed this ridge twice without any special equipment, but I know climbing equipment is frequently used for this climb; so my advice is that you use climbing gear for the ascent unless you're sufficiently acquainted with this sort of climbing. On this specific occasion I opted for a free climb without any special gear, as the planned hike was quite long, and I therefore wanted to keep the weight of my backpack as low as possible.
![Image #8: On the summit of The Bishop. The Troll Peaks, which line the top of the famous Troll Wall [Norwegian: "Trollveggen"] are seen in the background.](https://images1.peakbook.org/images/14939/Solan_20201216_5fda7929a289f.jpg?p=xtralarge)

The trail from Trollstigen Tourist Center up to Lake Bispevatnet is readily visible, and well marked; and is therefore easy to follow. The route up the south ridge of Mount Bispen is somehow marked by small cairns, but they are too far apart from each other, and the ridge is mostly quite stony; and so there's virtually no visible trail to follow. To begin with, you just work your way upwards from shelf to shelf, but high up in the mountain side, it suddenly becomes really steep up there; and that's where it may be a bit tricky to find the correct route. As another mountain trekker/climber commented when she saw Image #5: "The crux is exposed, but short." Myself, I've ended up with a new route each time I've climbed the south ridge of Mount Bispen: The first time, I got way too far out to the left, but managed somehow to find a way up even there. The second time I therefore tried to stick to the very edge of the ridge, but then I had to climb up a short overhang at one point. This third time, however, I tried to climb just a little bit left of that overhang; and that actually made this specific spot a little bit easier to climb. So, no I kind of think that I finally found the easiest route up this ridge.

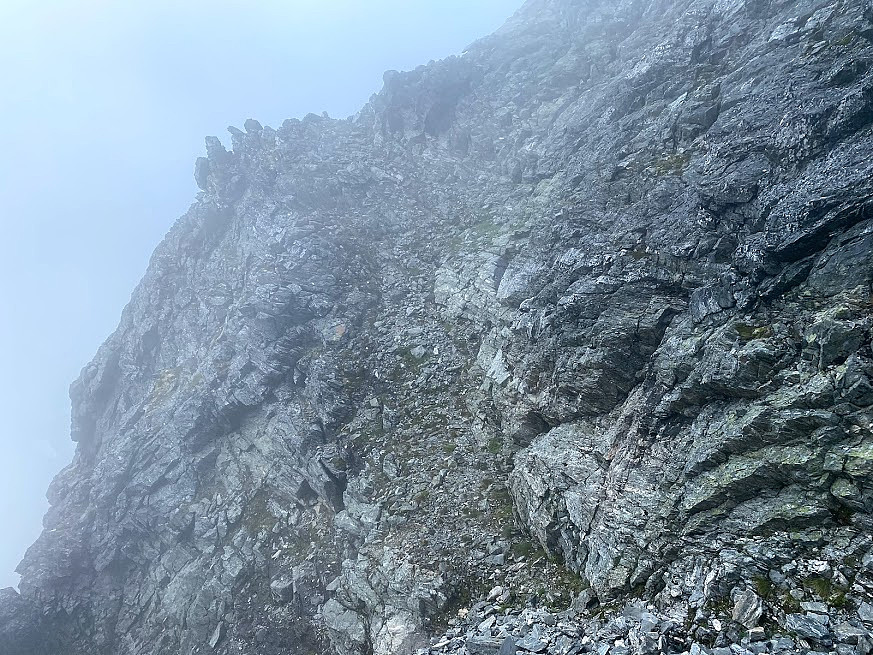
It took me slightly less than 2 hours to get from Trollstigen Tourist Center up to the summit of Mount Bispen, where I just stopped to have a little to eat and drink before I continued my trek. I had filled up my backpack with soda water, chocolate, and some bread in order to avoid running out of energy during the hike. From the summit of Mount Bispen, I descended along the north ridge of the mountain, down to the notch between The Bishop and The King. The north ridge of Mount Bispen is usually termed the normal route, and is feasible both to climb and to descend without any special climbing gear; though many will recommend the use of at least a helmet, as there's a lot of loose stones that may be set into motion by climbers higher up in the mountainside. When climbing Mount Bispen, mountain trekkers usually go by the same route as I did up to Lake Bispevatnet, then they follow a trail along the east shore of the lake to the notch between Mount Bispen and Mount Kongen; and where the route up to the summit of The Bishop parts ways with the route up to the summit of The King, they take the trail to the right, which is the one that I was now coming down. In other words, they more or less circumvent the Bishop from south to north via the west side, before they actually climb it. This route is actually very well marked with small cairns, and unless there's very heavy fog, you just can't miss the trail.

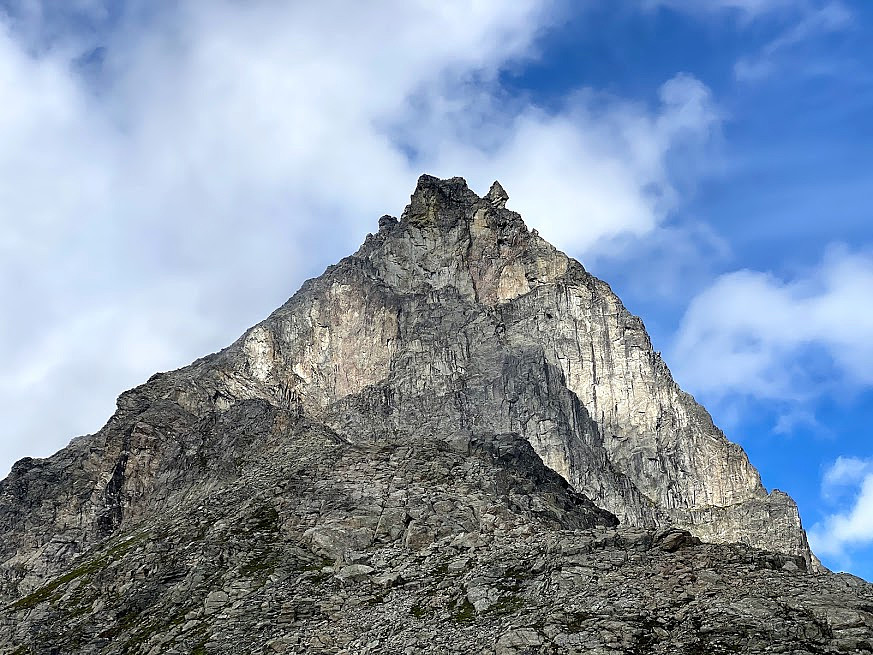
Once in the notch between The Bishop and The King, you cross over to where the south ridge of The King starts, and then you start climbing up that ridge (Image #10). This ridge feels much more "secure" than the north ridge of The Bishop, as there's mostly solid rock to climb and to walk upon, and not nearly as many loose stones as there is on the north ridge of The Bishop. The south ridge doesn't take you all the way to the summit of Mount Kongen, however, as most of the mountain's south face is just a huge vertical cliff. The south ridge actually takes you to from about 1120 m.a.m.s.l. (the elevation of the notch between The Bishop and The King), up to about 1350 m.a.m.s.l. on the west side of the mountain, where there is a number of chutes and ridges leading up towards the summit. Once you've reached these chutes on the west side, you'll notice that the route up to the summit of Mount Kongen [i.e. The King] is very well marked by red spots on the stones (Image #13). If you don't see any such red spots, then you're in the wrong chute; hence you shouldn't continue unless you see the red spots that will guide you ahead.
I reached the summit of The King about 3 1/2 hours after I left the Trollstigen Parking Lot. The weather had been fairly nice when I started out from Trollstigen, but by now it was actually deteriorating a quite a bit, mainly due to fog coming up from the valley called Haugabotnen north west of The King. Had I not been very well acquainted with these mountains after several earlier hikes, I might have had to abort my journey at this point; but as I knew this part of the trail "as well as my own pockets", and as I also had a very good GPS that I could use to find my way should the visibility decline even further, I decided to continue. The view from Mount Kongen is spectacular whenever the weather is nice, but on this occasion I couldn't even see the summit of the Queen from up there, even though the two summits are just about 200 meters apart when you measure the distance on a map.

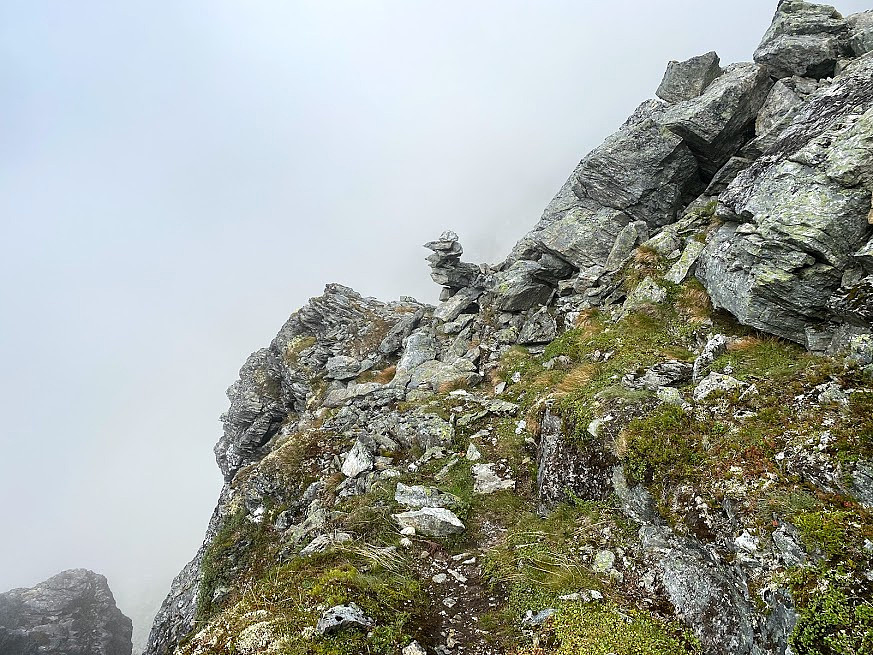
You can't descend directly from the summit of The King to the summit of The Queen, however, as there is a 100 meter deep notch (when measured from the summit of The Queen), with a vertical cliff of about 150 meters on the north face of The King. The customary way to climb/trek from The King down to The Queen, therefore, is to follow a westward ridge of The King down to a knoll called The King's Knee (Image #17), and from there follow some chutes and shelves leading over to The Queen. The climb down from The King to The King's Knee, follows a ridge on the west side of the mountain, and the trail is pretty well marked by small cairns all along the ridge down to "The Knee". On this part of the trek there are no longer any red spot marking, however. There are places where this downward climb is a little bit challenging, but in no way as challenging as the climb up the south ridge of Mount Bispen. I will, however, advice anyone making an attempt on this route to choose a non-rainy day, in order to avoid slippery stones.
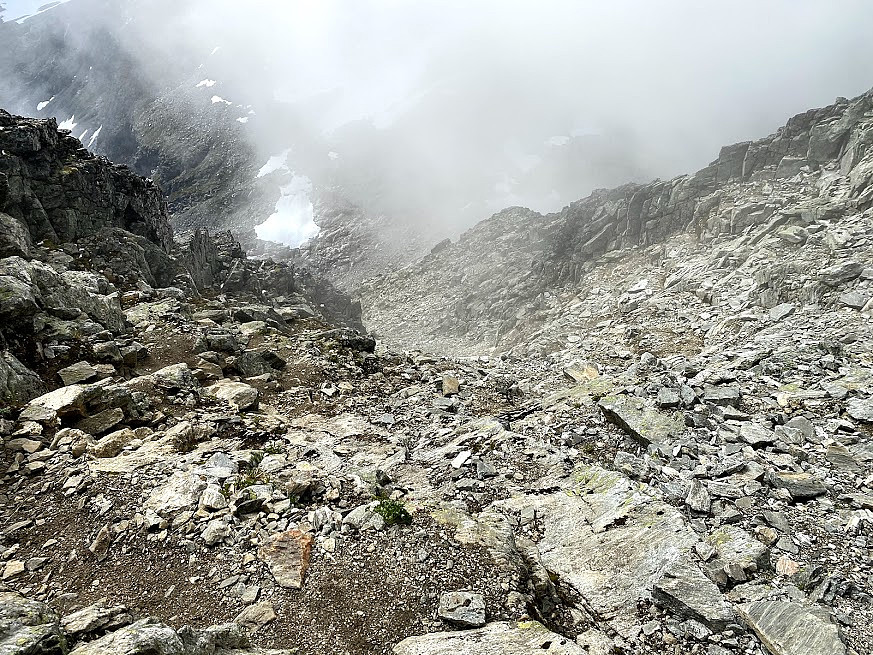
From The King's Knee, there is usually a very nice view towards Mount Bispen and Lake Bispevatnet in one direction, and towards Haugabotnen Valley and the fjord of Innfjorden in the other direction. Due to the fog, non of this could be seen on this day, however (Image #17); so I just continued on my way towards The Queen. From The King's Knee, you first have to descend a steep chute with loose stones (Image #18), and thereafter you continue along a shelf-like structure (Image #19). Trekking along this shelf is not too difficult, but you have to mind your step carefully, as the shelf is quite exposed; and you're unlikely to survive a fall into the valley beneath. This part of the trail is, however, quite well marked by small carins (Image #20). The shelf goes a little bit up and down, and then takes you down to a deep chute (Image #21) that kind of marks the border between The King and The Queen; as it extends all the way from the notch between the two mountains, down into the valley of Haugabotnen. The chute is usually covered by snow, but there is a creek running beneath the snow; and at this time of the year a substantial amount of the snow have usually melted away from below, so that the snow is just forming some sort of a roof some meters above the creek. If you have a look beneath the edge of the snow, you may actually see part of the creek deep down beneath the snow-roof.
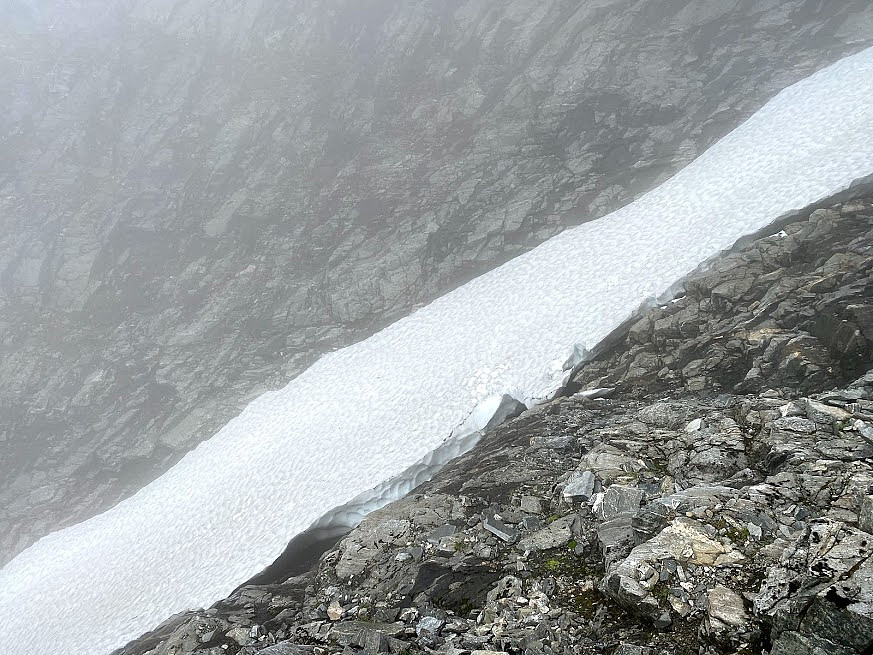
Last time I crossed this chute [August 17th 2019: Til Dronninga via Kongen og Kongskneet (The tour description is in Norwegian, but the pictures are nice even if you don't read Norwegian)], the snow in the chute was quite soft, (or at least the upper layer was), and my greatest concern was not to go right through the snow, and fall the 4 meters or so, down into the cold water of the creek beneath the snow. The snow was thinnest along the edges, however, and the middle part of it never had any problems with carrying my weight. This year, the snow was much harder, however, and that raised another concern: The slope of the snow is quite steep, and as hard as the snow was right now, you could easily start sliding down the chute; and I quickly realized I was likely to be killed if I so did. Unfortunately, I hadn’t brought with me any crampons, something I immediately regretted. I climbed carefully unto the snow, and started hammering as deep footprints as I could with the toes of my mountain boots, while at the same time also carving holes for my hands a bit higher up in the slope of the snow covering the chute. And in this manner, with my front side towards the snow, I carefully made my way step by step sideways towards the other side of the chute. I eventually made it to the other side, but by then all my fingers were freezing, and my toes were aching after all the hammering into the hard snow. I said to myself, that next time I was definitely going to bring with me a set of crampons; and I sure advice everyone else to do so as well, even if it means that you're carrying with you some additional weight.
After the crossing of the snow-roofed creek, you immediately arrive at a new challenge. Prior to the crossing of the snow-roof, there was this shelf that could be followed. After the snow-crossing, however, there is no shelf like that, and yet you have to somehow climb up to the edge of a westward ridge of The Queen in order to continue. This mountain side isn't that smooth, however, and every here and there you'll find some holes and fissures that you may use as the steps of a staircase; and as long as you progress with care, you're likely to be fine. The west side of Mount Dronninga has several ridges and chutes going in a westward direction. The chutes all have loose stones and gravel, but are feasible to climb, provided that you do it with some care. Be especially aware that any loose stones you set into motion, may hit people climbing further down the chute. Despite having visited The Queen several times, I didn't remember exactly which one of the chutes was the one leading most directly to the summit, or main peak of The Queen. The Queen actually have about 5 peaks, that makes the top of the mountain look a bit like a royal crown when viewed from the town of Åndalsnes. Anyway, since I now chose to climb up the second chute that I came to, and not the first, I reached the top area in a chute between the middle peak and the north peak of the mountain; so in order to visit the summit, I had to traverse back southwards a little bit, and then climb the final meters up to the summit. So, that's another piece of advice: In order not to loose time in search for the summit of The Queen; download and have with you a gpx file with a track to the summit, so that it becomes easier to embark directly upon climbing up the correct chute.
![Image #24: Approaching the top of Mount Dronninga [i.e. "The Queen"]. This last climb up to the summit is the steepest part of the climb up this mountain, and many opt to use climbing gear for the last 25 elevation meters or so.](https://images1.peakbook.org/images/14939/Solan_20201217_5fdbbae345a68.jpg?p=xtralarge)
The final 25 elevation meters up to the summit, or main peak of Mount Dronninga (Image #24), is pretty steep and exposed, and and poses quite a challenge. Just as for the climb up the south ridge of Mount Bispen, many choose to use climbing gear for this climb, as well as for the descent. Anyway, this is definitely the second most difficult and dangerous point along the entire trek that I did this day; i.e. only the south ridge of Mount Bispen poses greater challenge and greater danger. Moreover, when wet, the stones and rocks of the main peak of The Queen tends to become slippery; and so in rainy weather I would actually rather be on the south ridge of Mount Bispen than on the final climb of Mount Dronninga. On top of The Queen, I just had a little more to eat and drink, and shot a few more photos; before I climbed more or less the same way back down. I then traversed via the middle peak of the mountain, over to the north peak. There is a barely visible trail between these three peaks of the mountain, and it is somehow marked with small cairns; but you may have to look out for them in order to spot them. The middle peak looks like a huge boulder that you need to circumvent on the east side in order to get passed it. It's not at all difficult to circumvent it, but when you do that, you're actually moving on a tiny, extremely exposed shelf, with an almost vertical cliff down into Isterdalen Valley. From the middle peak, you move on to the north peak, which is often also referred to as the North Spire [Norwegian: Nordspiret]. As you approach the North Spire, you may either continue straight ahead, and climb across the huge stone called the Tilting Boulder (Image #26), or you may descend a few meters to the left of it, and then circumvent the peak on which it is situated on the west side; before you climb back up and arrive at the little plateau that has been named the North Spire. There is a little cairn up there on the plateau (Image #27); i.e. the cairn is located at the north end of the plateau, whereas the Tilting Boulder [but sometimes also called the Balance Boulder], is at the south end of the plateau (Image #28).
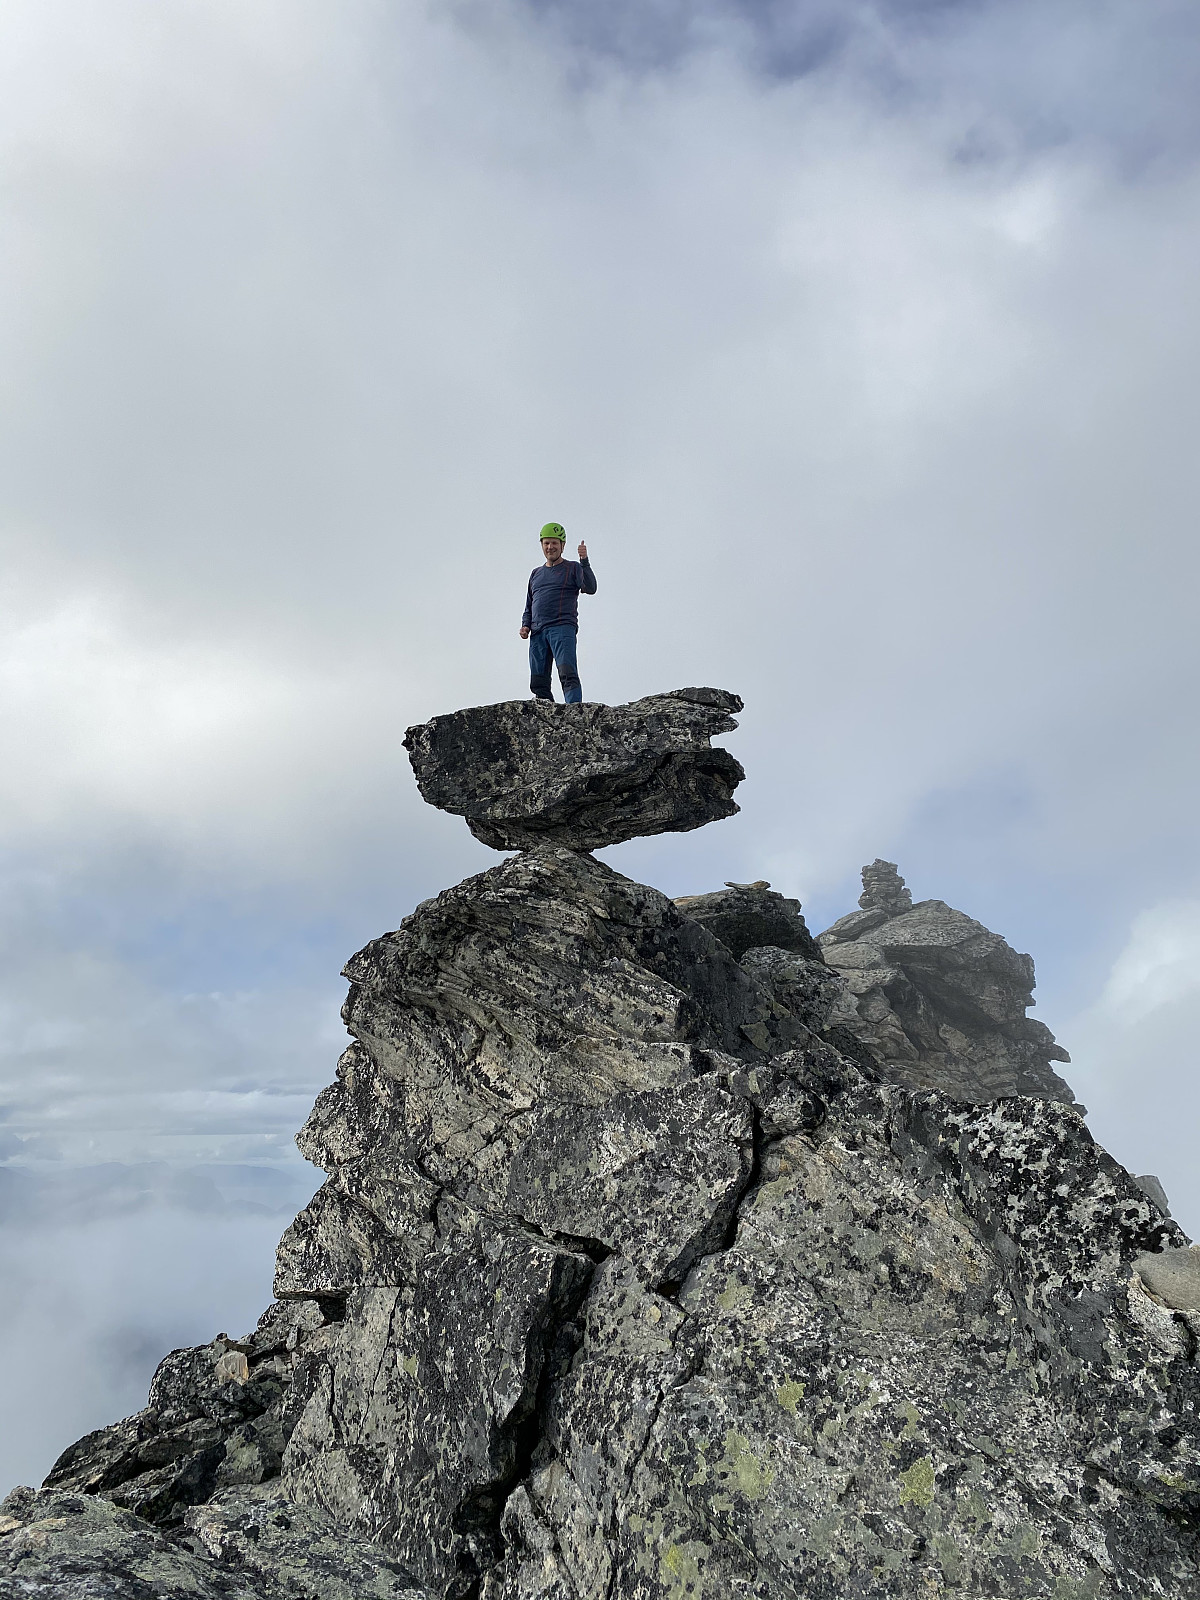
I was trekking all by myself on this day, and had no one to take my picture while on the tilting boulder; but I had recently purchased a little tripod, that comes with a little bluetooth operated remote control that may be set to operate the camera of your mobile phone (I also used this equipment for Image #5). So, I mounted my telephone onto the tripod, took with me the remote control, and circumscribed the Balance Boulder before I climbed it from the north. Once upon this huge rock, I shot a number of pictures, the best of which is displayed here as Image #26. From the Tilting Boulder, I got back down for my phone and my tripod, before I climbed back up on the North Spire, to shoot a few more images (Images ##27&28). While I was up there, it seemed as if the weather had started to improve a little bit. I could see blue sky through gaps in the clouds, and I could actually see the main peak of Mount Dronninga through the fog (Image #28).

The descent from the North Spire of The Queen, and over to Mount Haugabotntinden [Also called Karitinden] is pretty well marked with small cairns. The trail from Vikdalen Valley by the fjord of Innfjorden up to Mount Dronninga is considered by most to be the regular route to The Queen, and it has therefore been thoroughly well marked by enthusiasts; though not with red paint as the route up to the summit of The King. It's also possible to skip the summit of Mount Haugabotntinden when climbing or descending from Mount Dronninga, but that alternative route is much less well marked out, and when I've done that, I've ended up loosing the trail, and just going by sight towards the trail coming down from Mount Haugabotntinden.
![Image #29: As I descended from the Queen, I finally got beneath the clouds. The next mountain, seen on this picture, is called Haugabotntinden or Karitinden [i.e. “Kari’s Peak”].](https://images1.peakbook.org/images/14939/Solan_20201217_5fdbc10d34440.jpg?p=xtralarge)
![Image #30: A view towards the fjord called Innfjorden. The mountain to the right is called Karihaugen [i.e. “Kari’s Mound” – Kari being a quite common female Norwegian name]. The name of the mountain beyond it is Grisetskolten.](https://images1.peakbook.org/images/14939/Solan_20201217_5fdbc16a2fe4a.jpg?p=xtralarge)
On this day, however, I had no plans of skipping Mount Haugabotntinden, as my aim was to visit all the summits located along this majestic mountain range. The elevation of the notch between The Queen and Mount Haugabotntinden is about 1250 m.a.m.s.l.; and from there you have to climb about 100 elevation meters to get up to the summit of Mount Haugabotntinden [1356 m.a.m.s.l.] (Image #29). As I descended from The Queen down into the mentioned notch, I quickly came underneath the clouds, and it was immediately possible to see the remaining summits that I were still going to hike on this trip. The alternative name for Mount Haugabotntinden, i.e. Karitinden, is composed of the name Kari, and the word tind. Now, tind is a Norwegian word for peak, and Kari is a very commonly used Norwegian girl's name; and so the name Karitinden might be translated Kari's Peak. A little bit north of Karitinden, there's another little peak called Karihaugen [i.e. Kari's Mound] (1160 m.a.m.s.l.). These two names obviously have a common origin; maybe the name Karihaugen just signifies that it is a slightly lower peak connected to Mount Karitinden. Why Mount Haugabotntinden has two different names, I don't know. In some cases like this, the explanation is that people living on the west side of the mountain were having one name for it, whereas people living on the other side were using a different name for the Mountain. The name Haugabotntinden is derived from the name of the valley Haugabotnen on the west side of the mountain, and may be translated "The Peak of Haugabotnen Valley".
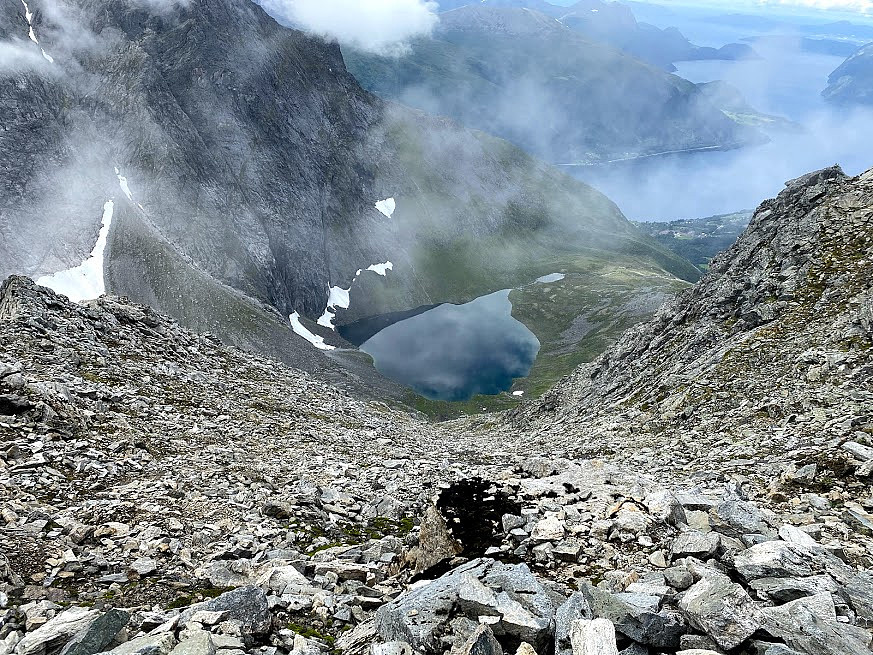
The trail from Mount Dronninga down to Vikdalen Valley runs just over the summit of Mount Haugabotntinden, and then down into the little notch between this mountain and Mount Karihaugen (see above). From this notch you usually follow the trail down to Lake Haugabotnen in Haugabotnen Valley, but as my plan was to hike the entire extent of the mountain range on this day, I skipped the descent to the left, and climbed up to the top of Kari's Mound instead (Image #32). From that knoll, I descended in a northeast direction, down to a second knoll [an unnamed one, as far as I know, but 984 m.a.m.s.l.]. The main challenge on the route between these two knolls, is that it's wet almost everywhere, mainly due to water from thawing snow; and there's lichen and moss growing on the stones, making them even more slippery. Once I had passed the 984-knoll north east of Karihaugen, it was less slippery, but from there down to Lake Svartebottsvatnet the mountain is very steep, and a bit tricky to descend. I had a few days earlier climbed up this mountain side on the east side of a third little knoll [about 850 m.a.m.s.l.], using a GPS device to follow an old trail, that I had encountered on several maps, including the map system used here on Peakbook. This old trail had, however, become completely overgrown by vegetation, and was absolutely nowhere to be seen; even when the GPS indicated that you were standing right upon it, and I still remember I was completely dependent on the GPS to actually find that route. While climbing up that way, I had, however, noticed from afar that it seemed easier to descend on the west side of the 850-knoll, and so today I opted for this choice. But that soon proved to be a bad decision, as this new route of mine was quite challenging. I somehow managed to get down, though. This mountain side is not quite as steep as the upper part of The Queen or the south ridge of The Bishop; and moreover, there are trees and bushes that you may hold onto, but still, it was a bit tricky to get down. Anyway, if I ever do this trek again, I'm probably going to descend on the east side of the lower knoll. After all, there's probably a reason the old trail still visible on maps was on the east side (See Image #33 for a map indicating these two choices).
![Image #33: An inclination map showing the steep mountain sides surrounding Lake Svartebottsvatnet. The dark red dotted line is my trail, with the dark red arrow pointing to where I departed from the old trail that may still be seen on maps, and which I had actually climbed myself with the help of a GPS device less than a week earlier. This old trail can no longer be seen in real life, however, even though it's still visible on old maps like this one. It may be seen as a gray dotted line (at which the gray arrow is pointing). It's a little bit difficult to spot on this particular map, however, as the overlaying colors indicating the inclination is blurring it out a bit. The two lower, unnamed knolls mentioned in the text are marked out with smaller map pins and "named" by their altitude (These knolls aren't registered PBEs [i.e. Peakbook Elements], and so you won't find them on the regular Peakbook maps.](https://images1.peakbook.org/images/14939/Solan_20201222_5fe235ab33ff9.jpg?p=xtralarge)
I finally reached the shores of Lake Svartebottsvatnet (520 m.a.m.s.l.). This lake is beautifully located in the valley called Svartebotnen [i.e. "The Black Bottom"], and there's even some forrest around it; especially on the shores of the east end of the lake. The shores of the lake is an ideal spot for camping: You can pitch your tent there, it's easy to find wood for a bonfire; and its pretty safe to drink of the water of the lake. So, if you would like to do this trek once upon a time, but you just think it's a little bit too long to do in one single hike; then an alternative is to go up from Vikdalen Valley (see map) to Lake Svartebottsvatnet a day or two in advance with your tent, your sleeping bag, some food, and some equipment for cooking, and have these things waiting for you as you come down from Mount Haugabotntinden. By choosing this option, you could even bring with you some climbing gear for the ascent of The Bishop and The Queen, and crampons for the crossing of the snow-roofed chute between The King and The Queen; and then just leave these things behind in the tent after a night by Lake Svartebottsvatnet, if you feel comfortable to hike the rest of the route without this special equipment. Of course, you'll have to come back to Lake Svartebottsvatnet for your equipment a day or two later, but that won't cost you much, as the hike along the trail up from Vikdalen Valley to Lake Svartebottsvatnet only takes about 1 hour. If you're the kind of person that can afford to have a support team for such a trek, yet another option is to have your support team bring the tent and the rest of the stuff up to the lake.
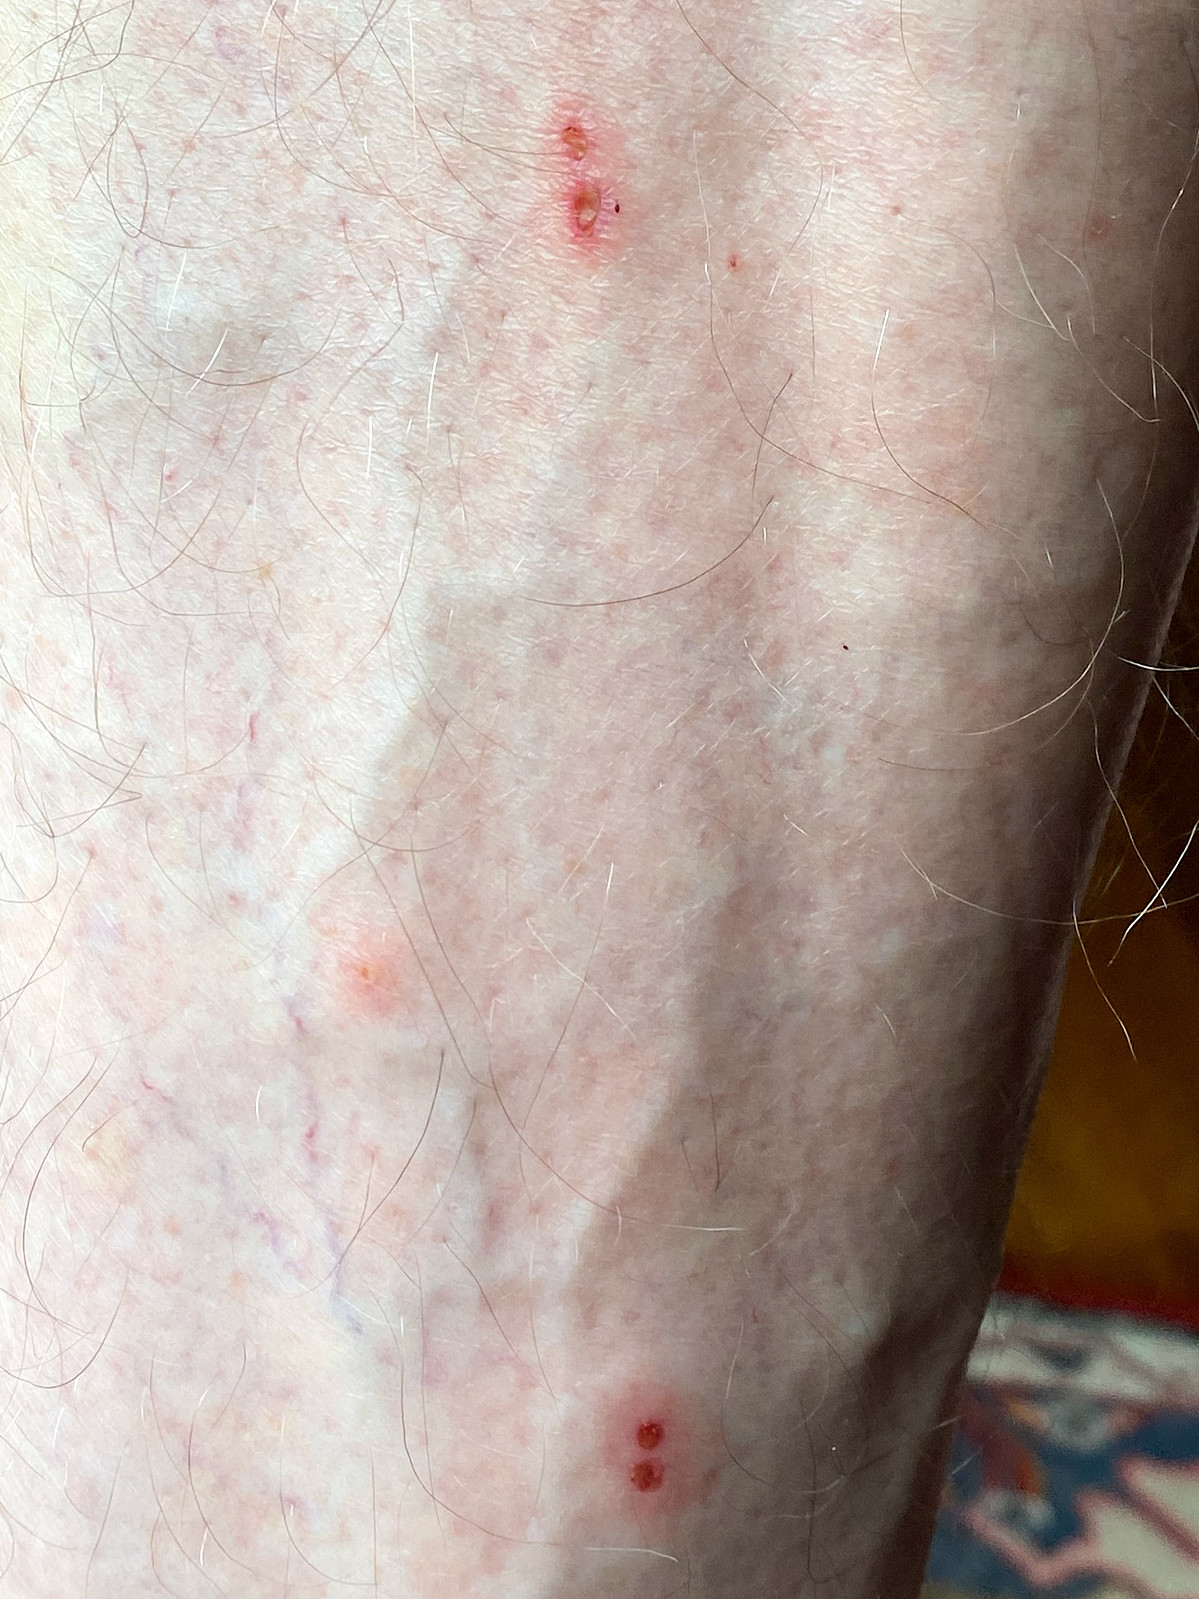
Lake Svartebottsvatnet and its surroundings are indeed beautiful. There are, however, heaps of stones, and birch forrest with quite dense heather covering the forrest bottom; and so the location is not just ideal for camping, it is also an ideal habitat for snakes. As I traversed the stone piles and the forrest in the valley, I tried to look out for snakes; but I have obviously stepped onto some of them without even noticing. As I continued my hike, I did feel some itching on my left calf; but I couldn't see anything when I checked it out. Over the next hours, however, the snakebites became visible, first as paired purple spots indicative of localized hemolysis beneath the skin, and then after a day or so as the open wounds visible on Image #35. I actually had 5 of these bite marks on my left leg when I came home; two on each side of the calf, and the fifth on the posterior aspect of the calf. Luckily, the common European Viper (in Norwegian called Norsk Hoggorm) isn't too poisonous. Some people become pretty ill after a bite, with intense nausea and back pain (because the kidneys are excreting the poison); while others notice almost nothing. As for myself, I've been bitten by a viper once before. The Norwegian / common European viper doesn't always inject that much poison when biting a human, as it tends to save the poison for its prey. Nevertheless, even a so called dry bite may give you some immunity that will offer some protection at later encounters with the species; unless, of course, you develop an allergic reaction to the poison, which may be at least as hazardous as the poison itself. Most of this day's trek was, however, above the vegetation boundary (see Image #44), and I believe the area around lake Svartebottsvatnet, along with the final part of the descent towards the town of Åndalsnes, are the only places you would be likely to encounter any snakes.
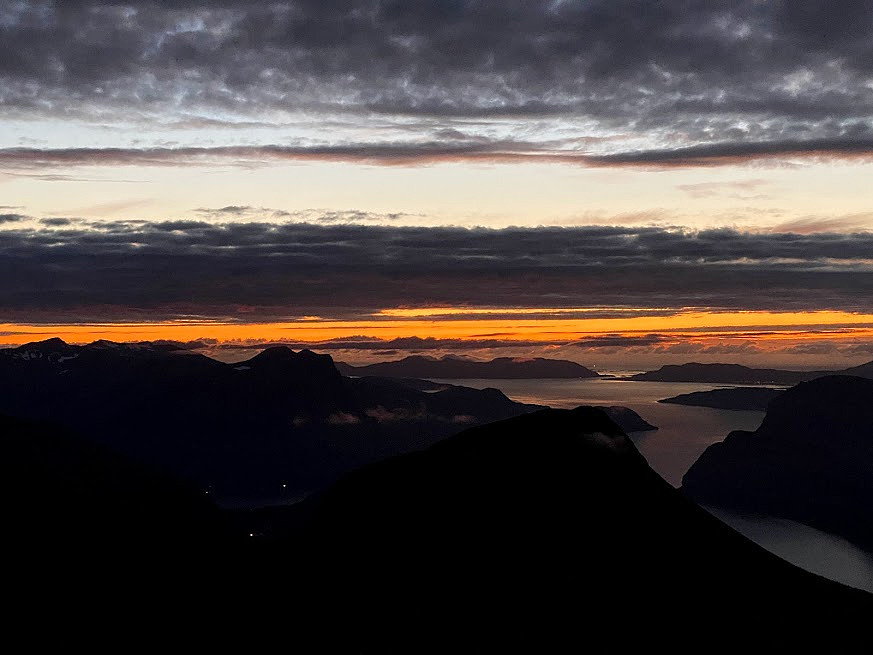
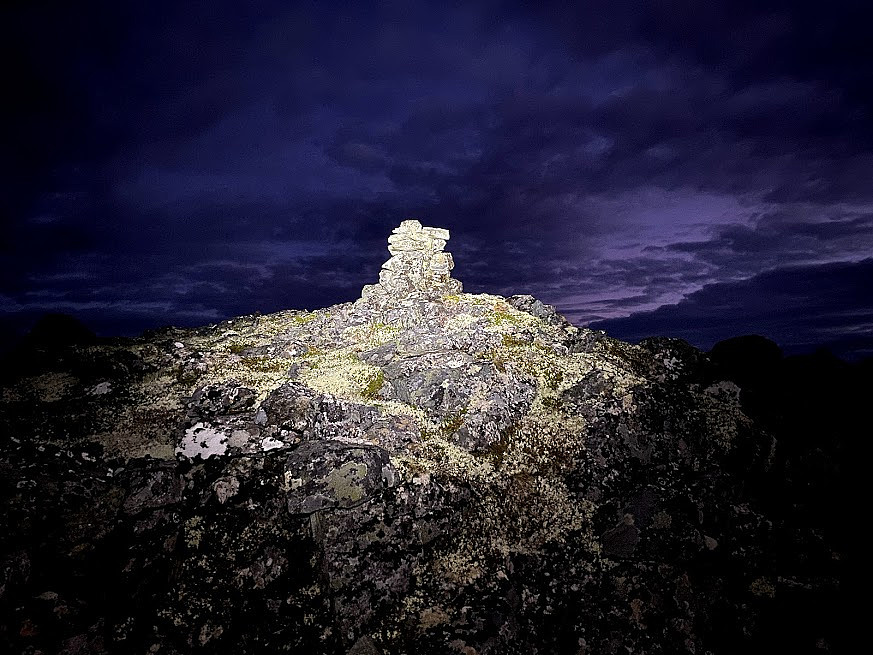
From Lake Svartebottsvatnet I climbed upwards through the birch forrest, towards a steep chute that I had climbed once before (Image #36). This chute is quite steep, but there are enough cracks in the rock to hold onto, and free climbing up here is actually quite fun. The chute eventually leads up to the edge of the southeast ridge of Mount Svartebottstinden. The forrest pretty much ends where the chute starts, and as you reach the edge of the southeast ridge, the main vegetation is heather. As I continued up the southeast ridge towards the summit of Mount Svartebottstinden, the sun went down, and it was becomming dark. I reached the summit while it was still twilight, and while you could still see the post sunset orange color in the northwest sky (Image #38). Darkness quickly ensued, and I would now have to rely on my headlight for the rest of the hike. I replaced my climbing helmet with my Lupine Betty X Pro, and switched it on. I've been having this headlight since 2008, I think. I had to replace the battery a couple of years ago, but the headlight is still working nicely. I have to admit, though, that it only has 2800 lumens, which is a bit less compared to what similar headlights and torches have today. Nevertheless, 2800 was "state of the art" back then, and as long as the light is sufficient for me, I haven't had a reason to replace the torch.
Till this point, i.e. the summit of Mount Svartebottstinden, I had been quite well prepared, as I had been trekking every part of the route in advance. I had also climbed Mount Setnesfjellet from the town of Åndalsnes along with my son a few weeks earlier. I had, however, never trekked the distance between between Mount Svartebottstinden and Mount Setnesfjellet, I had just been observing this part of my route from afar; and I had never visited the peaks called Brøttfonntinden, Ølmannstinden and Nordre Ølmannstinde [i.e. Northern Ølmannstind]. I have to admit I had been thinking that the challenging part of my trek was going to be the first half of it, and that the route between Mount Svartebottstinden and Mount Setnesfjellet was going to be more like an ordinary mountain hike. There I proved myself to be wrong, however. Well, the first part of this route, i.e. from Mount Svartebottstinden to Mount Brøttfonntinden was easy: The trail was stony, but nice and clearly visible in the light from my headlamp, and it was just to follow the trail, and it took less than half an hour to get over to Mount Brøttfonntinden (Image #39).
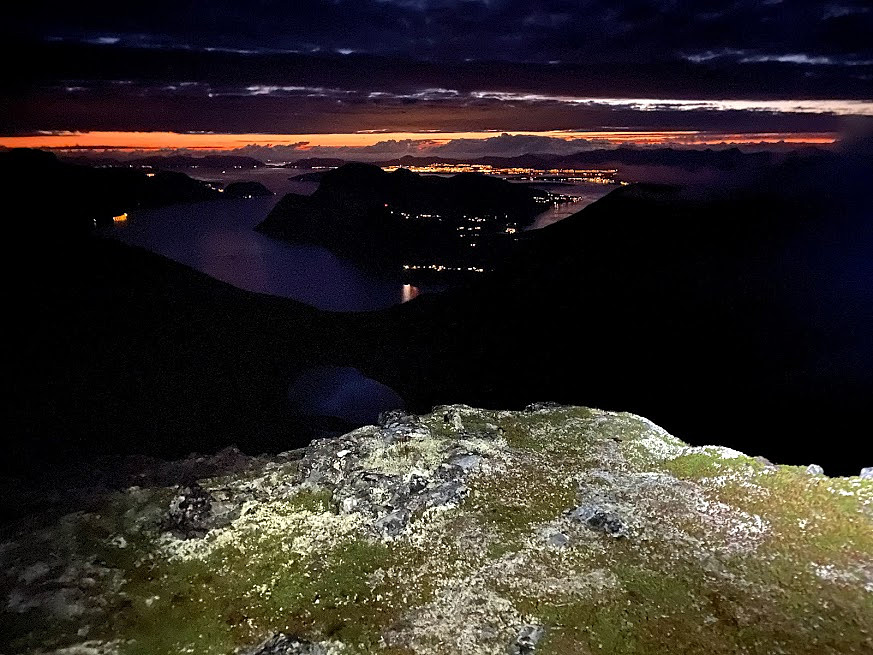
The first part of the descent from Mount Brøttfonntinden was a little bit steep, and the trail was a bit difficult to spot at places, as there's mostly just stones, moss and lichen up here. Fortunately, however, the trail from this mountain to the next, was marked out on the map of the inclination app that I have on my mobile phone [The app is called Bratt, "bratt" being the Norwegian word for "steep"]. And so, with the app open, and the mobile device in one hand, I carefully descended the mountain; while keeping one eye on the trail, and one eye on the map, so to say. After a descent of about 60 or 70 elevation meters, the trail eventually flattened out, and you could just follow it onto a mountain ridge leading up to the summit of Mount Ølmannstinden. As I followed this ridge towards the summit, there was one spot a large snow patch still covering the ridge; but it was rather flat on top, and so crossing it was quite uneventful. From the summit of Mount Ølmannstinden I had a marvelous view towards the fjord (Image #41). It was becoming increasingly dark by now, however, and the only things I could se was some remaining sunlight in the far northwest, in addition to electrical light from the inhabited farms, villages and towns, and then there was whatever my headlamp would light up.
![Image #40: On top of Mount Ølmannstinden [i.e. The Beerman’s Peak]. I'm not sure whether there once lived a brewer – a “beerman” in the valley beneath the mountain, or why else the mountain was named like that...](https://images1.peakbook.org/images/14939/Solan_20201217_5fdbcf4532f85.jpg?p=xtralarge)
From the summit of Mount Ølmannstinden, there was no trail over to the next peak, i.e. Mount Nordre Ølmannstinden; neither on the maps, nor in real life. I tried to use the bratt-app again, as there seems to be a spot where it should be possible to descend directly towards the foot of a ridge leading up to The Northern Beerman's Peak (see Image #42). And maybe it would've been possible to climb down there in daylight, but in the limited light that I had from my headlight, this "passage" just looked too steep. And so I decided to go back along the ridge by which I had climbed The Beerman's Peak, and find an alternative route further on. I found a slope on the north side of the ridge that seemed not to be too steep as indicated by the inclination map, and I decided to try that one. Descending along this slope would've been feasible had the ground been dry, but there was water dripping everywhere (from the thawing snow patch above), and again there was lichen and moss growing on the stone; and so the route was quite slippery. I eventually managed to get down to the foot of the ridge leading up to the next Beerman's Peak, but the descent took me quite a while; so I've been thinking maybe I could've saved time by going far west along the regular trail up to Mount Ølmannstinden, and then traverse over to the ridge leading to Mount Nordre Ølmannstinden from there. The distance would've increased, had I chosen a route like that, but I still could've saved time on it. The lesson to be learned from this, is of course to to the necessary research in advance of such a long trip, as I had thoroughly done for the rest of it; but not for this particular leg of the hike. Anyway, if I ever do this long hike again, I will 1) explore the possibility of a direct route down from Mount Ølmannstinden towards Mount Nordre Ølmannstinden, and 2) start the hike earlier in the morning, so as to make sure I will reach the descent from The Beerman's Peak while there is still daylight. [And in addition I will bring with me a GPS track taking me directly to the summit of the main peak of Mount Dronninga, in order not to waste time on going back and forth between the three main peaks of The Queen].
![Image #42: Inclination map showing the steep mountain sides of Mount Ølmannstinden [i.e. The Beerman's Peak] and Mount Nordre Ølmannstinden [i.e. The Northern Beerman's Peak]. The route that I would have attempted if I had dared is the one indicated by a blue dotted line, the route that I actually hiked is the one following the dark red dotted line; and the one that would have been longer, but possibly quicker, is the one along the gray dotted line. I'm still thinking of visiting Mount Ølmannstinden again in the future, to explore whether it is possible to climb down along the dotted blue line or not.](https://images1.peakbook.org/images/14939/Solan_20201222_5fe25e90929fd.jpg?p=xtralarge)
Once I reached the foot of the ridge leading northeast towards The Northern Beerman's Peak, the hike was again easier. I felt quite good by now, though the hike had been long, and there was still a long hike ahead. I still had some food in my backpack, I still had plenty to drink; and I even still had plenty of power on the battery of my headlamp. (I invested in a larger battery when I had to buy a new one a few years ago). From the moment you leave Lake Bispevatnet and the river coming out of it, there's nowhere you can fill up a water bottle, until you've passed Mount Haugabotstinden. During my descent from Mount Karihaugen, however, I had filled up some of my bottles with water from a little mountain creek, and then down by Lake Svartebottsvatnet I filled up every bottle that I had with water from the creek coming from the lake. And now for a third time, I had just filled my bottles with water from one of the creeks in the mountainside where I had climbed down from Mount Ølmannstinden. An so, I continued my journey in good spirits.

It now didn't take me long to reach the summit of The Northern Beerman's peak. The hike further on to the summit of Mount Setnesfjellet, however, was a bit longer than I had anticipated, but there were no other challenges along this part of the route. I finally reached the summit of Mount Setnesfjellet [1238 m.a.m.s.l.]. The descent from that mountain is actually a bit steep, but it was less than 2 months since I had visited this mountain with my son; and so I was at list a little bit familiar with it. Since it was dark I tried to avoid the steepest slopes by following a ridge and some chutes a little bit to the right of the usual trail, as these ones are less steep than the ones usually followed. This brought me a bit too far south, however; but I still had the GPS track from my last visit on my Garmin inReach Explorer+, so it was easy to keep an eye on my whereabouts compared to that track. Moreover, daylight was now starting to come back little by little (the Norwegian summer night is indeed very short), so I even tried to keep an eye on the ridge to the left of me, in order to spot a satellite disc antenna that I new was located somewhere around 800 m.a.m.s.l. And there it was. Once I saw the antenna, I started making my way through heather and bushes towards it. From the location of the antenna there is a well marked and clearly visible trail all the way down to the town of Åndalsnes, and so I headed over to the antenna in order to follow that trail for the rest of my descent.
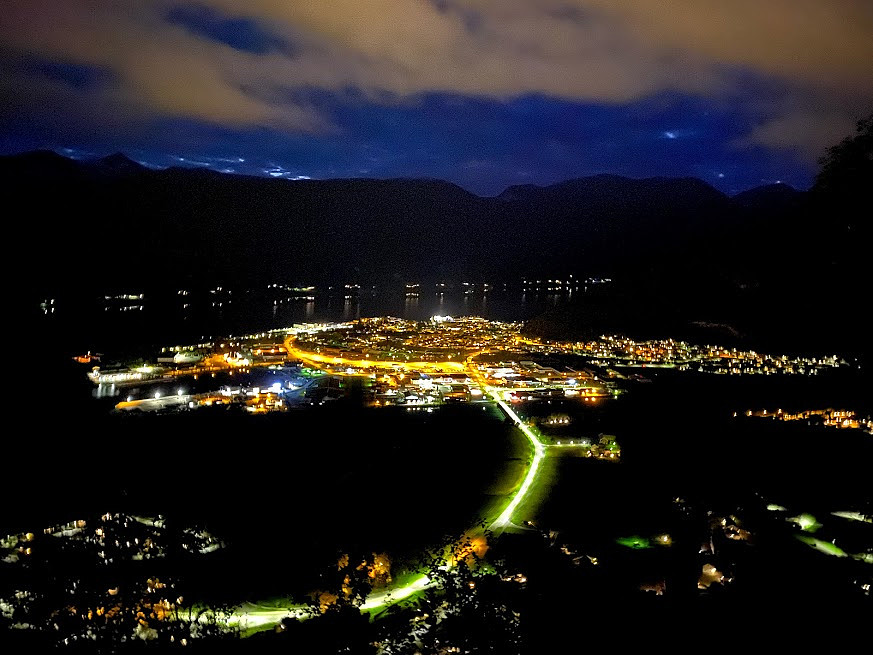
The trail down to Åndalsnes from The Setnesfjellet Antenna goes through birch forrest, and is quite muddy at places, even when it hasn't been raining for days. There are places where it's difficult to avoid stepping into the mud, but many places you can hold onto a birch tree, and kind of swing yourself over the worst mud holes, and thereby avoid stepping into them. At maybe 4 or 500 m.a.m.s.l., I came to a little creek, from which I had been drinking water last time I climbed this mountain. I had some more to drink there, and then filled up my water bottles a last time, before continuing my descent. At about 320 m.a.m.s.l. there is a nice viewpoint overlooking the town of Åndalsnes. The view from up there actually is picturesque, and i got a nice night photo from up there (Image #44), even though darkness was no longer as deep as it had been earlier in the night. I reached the town of Åndalsnes in the early morning hours. No shops or anything, not even the fuel stations were open, and I was afraid I was going to start freezing if I sat down; so I just made a phone call for a taxi, that took me back up to the parking lot of Trollstigen Tourist Center, where I had started out in the morning. In the car I had dry clothes waiting for me, as well as food and drink. I was a bit tired by now, and somehow also a little bit exhausted. I remember stopped three times or so for a sleep on my way home, as I was a bit too tired to drive.


Kommentarer